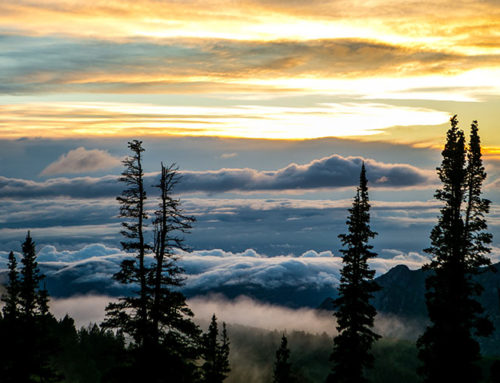
As you know, the time and place play a major factor in how your landscape photography turns out. After spending a decade shooting various landscapes, I’ve finally discovered what really works the best:
- Try to go out and shoot photos of the sky on cloudy days. The reason for this? Cloudy days are ideal, due to the fact that on days like this, the sun is shaded more. This helps equalize the contract in your photos, therefore creating the best lighting for post-production later on.
- If you find yourself stuck shooting on a sunny, bright day, do your best to wait until dusk or dawn to begin taking the photographs. I can assure you, the photos will turn out significantly better if you shoot in these lighting conditions.
Recommended best settings for Landscape Photography:
- Shoot RAW
- Set to 14-bit lossless compressed (if available)
- Turn off high ISO noise reduction
- Turn off lens corrections
- Turn off Active D-Lighting (or Dynamic Range Optimizer – goes by other names)
- Autofocus: Acceptable to use in good conditions
- Autofocus using the AF-ON button (or assign a button to that task)
- Select the autofocus point yourself
- Use single-servo autofocus in live view for nonmoving scenes
- Use continuous-servo autofocus for moving subjects (via the optical viewfinder if you have a DSLR)
- Manual focus: Use if autofocus is not giving you a sharp result
- Focus manually at 100% magnification in live view, with a tripod
- Picture Control: Set to its default style, or to the lowest possible contrast if you are a histogram maniac (though beware of underexposing)
- White balance and tint: Use whatever gives you a good preview (often just Auto), or find your camera’s UniWB if, again, you are a histogram maniac
- Turn on long exposure noise reduction, assuming that you are willing to wait twice as long for your camera to capture long exposure photos in exchange for fewer hot pixels
- Enable blinkies and the histogram
- Disable “rotate tall”
- Enable one-click zoom when you review a photo (if available)
Recommended exposure settings for Landscape Photography:
- Use manual or aperture-priority mode so that your camera doesn’t adjust the aperture automatically
- Set your aperture to balance depth of field and diffraction – typically, at a full-frame equivalent of f/8 to f/16 (but a larger aperture for night time photography, when you have no other choice)
- Keep your ISO at its base value. In most cases, turn off auto ISO
- Set your shutter speed to give you a properly exposed photo
- If your chosen shutter speed introduces too much motion blur, you’ll need to raise your ISO in order to use a faster shutter speed
- Use whatever metering mode you’re most comfortable with
- Adjust exposure compensation if your meter is recommending exposures that are too bright or too dark
Optimizing Exposure of the Land & Sky
This tip is key: Always expose to the sky.
Generally, the photograph on camera looks worse when you do this. However, in the editing process afterwards, you’ll be able to bring the shadows out a lot more than you can bring down the highlights.
When you are trying to expose the earth and sky landscape, shoot using HDR. HDR is an abbreviation for High Dynamic Range imaging. This is a seasoned photography technique that has recently been re-introduced, and is now available on some smartphones. HDR is presumed to make your photographs look better. However, that depends immensely on how and when you use it. Here’s a quick rundown on how HDR works, and when you should (or shouldn’t) turn it on.
(HDR – when to use it, when not to)
HDR – as its name suggests, is a strategy that aims to add more “dynamic range” to photographs, where dynamic range is the ratio of light to dark in a photo. Instead of taking a single photo, HDR snaps three consecutive photos, all taken at a different exposure. From there, you can use image editing software (such as Adobe Photoshop or Lightroom), to layer the three images together and highlight the best parts of each photo. The result? A remarkably more realistic photo, including details that align with what the human eye sees, rather than what a camera lense sees.
When Should You Use HDR?
As previously stated, HDR was designed to assist in taking better-looking, more realistic photos. Here are a few situations where you should try using HDR:
- Landscapes: Due to the large size of most landscape photos, it is difficult for your camera to capture all the contrast between land and sky. By turning on HDR, you’re ability to capture the sky’s detail without making the land look too dark, or vice versa.
- Portraits in Sunlight: Everyone knows that the right lighting is essential when taking a portrait photo. To avoid dark shadows or harsh washed-out sunlight in these types of photos, go ahead and turn HDR on. It can even make your subject look better than they do in person.
- Backlit or Low-Light Scenes: Let’s say your photo is looking a little too dark, which often happens when your scene has too much backlight. HDR can brighten up the foreground without washing out the well-lit background of your photo.
When not to use HDR?
HDR may be great for certain situations, but this feature can actually make your photos look worse if it is used in the wrong circumstance. Here are some conditions is which HDR is better off forgotten:
- Photos with Movement: If there is any movement in the range of your photo, HDR will increase the chance of it turning out blurry.
- High-Contrast Landscapes: In situations where you’re trying to create a silhouette, HDR can make your photo look less intense. Resulting in a much less interesting photograph.
- Vivid Visual Colors: When your landscape is too dark or too light, HDR can bring some of the color back into the photograph. That said, if you are taking a landscape shot where the colors are already vivid, HDR can actually wash them out.
[/fusion_text][/fusion_builder_column][/fusion_builder_row][/fusion_builder_container]