Explore the true beauty of your photographs with Lightroom Presets | By: Presets.com

Photography is more than taking photos.
Taking the photo is only half the battle. As a creative photographer, your job is to take photos and work with them through the editing process.
Adobe Lightroom presets are here to change how you look at the photography business. With Adobe Lightroom presets, you can create top-quality photos that reflect only the highest quality professional experience available.
No more frustrating, time-consuming edits. Photo editing just got ten times easier!
This guide includes resources to take advantage of the Adobe Lightroom preset feature.
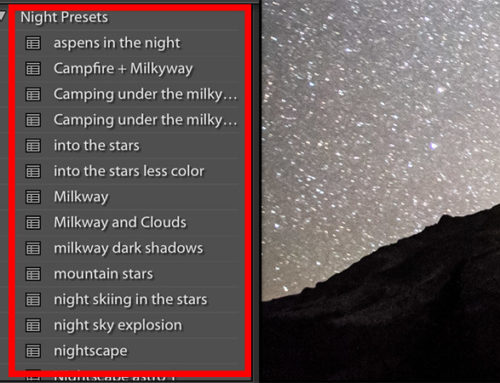
What Are Lightroom Presets?
Quick definition: Lightroom presets are an array of photo edit settings within Lightroom, which bundle together, creating a polished final result. All this with only the click of a button. You, too, can benefit from this simple yet effective photography tool.
How To Use Lightroom Presets
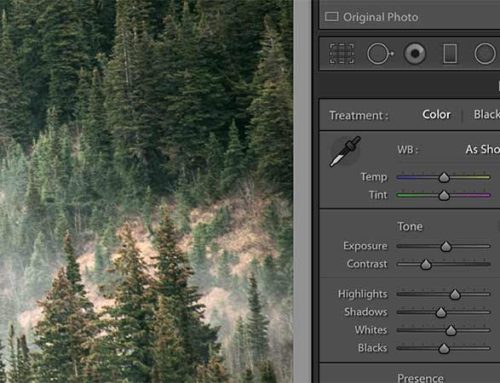
- With an image uploaded and selected in Lightroom, click the ‘Edit’ icon.
- Locate and click ‘Presets’ at the bottom of the column of editing panels. This will open up the presets panel.
- From the ‘Presets’ panel, find and select the category title to open the presets in that given category. (To preview how a preset will look on your image, hover over the preset without clicking on it. You’ll notice that some of the controls in the editing panel will change. Expert Tip: This is an effective way to teach yourself about the effects of different editing controls in Lightroom.)
- Once you find a preset you like, click on it to apply the preset to your image. You can apply one or multiple presets to an image.
- You can remove a preset using the ‘Undo’ or ‘Revert to Original’ commands in Lightroom.
- If you want more than one version of a photo, each with different presets applied, choose ‘Edit’ > ‘Make a Copy.’ By doing so, an additional copy of the image will appear in your photo library.
How To Install Lightroom Presets
ADD & IMPORT LIGHTROOM PRESETS
You can use a couple of different methods to import and install Lightroom presets, simply depending on which version of Lightroom you are using. You can also find tons of free Lightroom presets online for any portrait photo or nature shot. Of course, a free preset won’t be as good as professional Lightroom presets, but they can still look great in the hands of a professional photographer.
Here’s how to download preset bundles from Versions 4-6, CC 2014-2017, CC 2018, Classic CC 2018, and Lightroom Mobile.
FOR LIGHTROOM VERSION CC 2018
- Open your zip file.
- Save the selected preset folder on your computer before importing Lightroom presets.
- Copy (Command + C on a Mac or CTRL + C on a PC) the entire preset collection folder you’ve chosen to import. Be sure you do not copy any PDFs or Brush folders by accident.
- Open Lightroom CC and select the ‘Editing’ icon from the upper right corner of the menu bar, which is located on the right side of your screen.
- Click on ‘Presets’ at the bottom of the editing panel you’ve just opened. This will open up the Presets panel.
- Click on the three dots at the top of the Presets panel and then click ‘Open Presets Folder.’
- From there, you will be taken to a folder labeled ‘Develop Presets’, where you will see a folder inside of it named ‘User Presets.’ Go ahead and click inside the ‘User Presets’ folder and Paste (Command + V on a Mac or CTRL + V on a PC) the entire preset collection folder into the ‘User Presets’ folder.
- From here, you will need to restart Lightroom. Then you’re done!
FOR LIGHTROOM VERSIONS 4-6, CC 2014-2017, AND CLASSIC CC 2018
Save your selected presets folder in an easy-to-find location on your computer for quick access.
Copy (Command + C on a Mac or CTRL + C on a PC) the entire preset collection folder (make sure you don’t copy any PDFs or Brush folders during this process).
Open Lightroom and select the following from the menu bar: Mac = Lightroom > Preferences. PC = Edit > Preferences.
Once the Preferences box pops up, make sure you are on the Presets tab, and then click the ‘Show Lightroom Presets Folder’ button.
At this point, you will be taken to a folder named ‘Lightroom.’ Click inside it and find the ‘Develop Presets’ folder.
Paste (Command + V on a Mac or CTRL + V on a PC) the entire preset collection folder you chose earlier into the ‘Develop Presets’ folder.
Lastly, restart Lightroom, and you’re good to go!
Lightroom Mobile
To download mobile Lightroom presets, download the Lightroom app and you’ll be good to go. Keep in mind that it takes a while for mobile devices to download because of file size.
If you have an Adobe subscription on desktop, it may be easier to use Lightroom Mobile for desktop presets. But if you’re looking to post presets on your Instagram feed, it’s recommended you use the program on your phone. Depending on the preset pack, it might be easier to download presets onto your laptop, then convert them into Instagram photos right there.
How To Make Your Own Lightroom Presets
Want to know how to make Lightroom presets on your own?
You can absolutely get in the groove of Lightroom by making your own presets, exporting them, sharing them, or even importing presets from other photographers. Firstly, you will need to change your image to be able to save a ‘preset.’ You could start with a Tone Curve adjustment. Go to the ‘Tone Curve’ panel, and select the ‘Point Curve’ icon.
Now, go ahead and click about ½ to ⅓ of the way from the bottom. Finally, click the square box at the bottom right of the box and proceed by dragging it up while holding down the ‘Shift’ key on your keyboard. The black parts of your image fade, giving it a cool-retro look. You can see the before and after view of this edit by pressing the ‘Y’ key on your keyboard.
If you like the effect you’ve created, you can save it by going over to the ‘Presets’ panel and clicking the plus (+) within the panel header. Another option would be choosing ‘New Preset’ in the ‘Develop’ menu, or use the keyboard shortcut, as follows: Shift + Command + N on a Mac or Shift + Control + N for PC. This shortcut opens the ‘New Develop Preset’ dialog box, where you can save your settings.
How To Correctly Save Your Lightroom Preset
Okay, listen up!
This is a good moment to talk about what you include (or not include) when you save your presets. You have the option to simply save everything into the preset (this is the default). No harm in this, except it generally means that the preset you created will only work on photographs that start out looking like the one you just edited. Another downfall is that the preset you just created will overwrite all developed settings you applied to the image before creating the new preset. Basically, any other work you’ve already done to the photo will be lost.
But don’t worry, there are better options ahead!
The second option you have is to exclude ‘Exposure’ from your preset. When you choose this route, any changes to the apparent brightness of your photo that you may have applied before creating a preset will remain intact. A much better option!
The third option you have is to only save the settings that are making any change to your photos. In this case, we’ve just used the ‘Tone Curve,’ so you could press the ‘Check None’ button, then tick ‘Tone Curve,’ followed by ‘Process Version.’ Always best to include that last tick so that all prior settings apply correctly.
As far as organization goes, we recommend making an additional ‘New Folder’ for the presets you’re creating. To do so, click the ‘Folder’ menu and select ‘New Folder’ at the top of the menu. Now, name the new folder ‘Tone Curves’ (in this case). Last but not least, go ahead and give your new preset a useful name. For this example, you could use a name like ‘Fade Blacks’ or ‘Lighten Blacks.’
How To Apply Your Presets On Other Images
Alright, now that you’ve created a preset, it can now be applied to any other photographs. Feel free to test out the new presets on an image with other settings already applied or a raw one. If you saved your preset correctly, you should have no trouble testing it out without losing any prior edits made on your image.
How To Share The Preset With Others
One of the coolest features presets offer? The ability to share the presets you make with other fellow photographers.
Follow the steps below to share your preset:
- Right click on the preset you wish to share.
- When the dropdown menu appears, choose ‘Export.’ (Notice how you can also choose ‘Import’ from this point, which is also how you can get shared or purchased presets downloaded into Lightroom).
- Once ‘Export’ has been selected, you’ll receive an ‘OS Save’ window. The ‘Suggested Filename’ should have auto-populated the name you first gave the preset, followed by ‘.Irtemplate.’ This is the required file extension for presets. As always, we suggest saving your presets somewhere you’ll be able to easily find them for later use.
Where Are Your Presets Stored?
At this point, you’re probably wondering where the un-exported Presets are stored.
Follow the steps below when trying to access your Presets:
- Open ‘Lightroom Preferences.’ You’ll find this in the ‘Lightroom’ menu on Mac or the ‘Edit’ menu on PC.
- Select the ‘Presets’ tab (shown in blue below) once the ‘Preferences’ box is open.
- You’ll see a button labeled ‘Show Lightroom Presets Folder’ in the middle of the pop-up box.
- Go ahead and select that folder. Once it opens, you’ll see a subfolder labeled ‘Lightroom’ auto-selected. Open that folder to find all of the ‘Lightroom Presets’ and ‘Templates’ folders for Develop, Slideshow, and so on. The one you want to choose will be labeled ‘Develop Presets.’
- If you have a good amount of downloaded or purchased presets that you’re looking to add to Lightroom, it is quicker to open the ‘Develop Presets’ folder and proceed to drag-and-drop all desired presets into the folder at once. If this situation applies to you, make sure to restart Lightroom to finish the downloading process.